Summary: FL Studio ships with Parametric EQ 2, a seven-band equalizer that handles most professional mixing tasks when paired with quality source sounds.
A raw beat loaded with stacked frequencies will always sound muddy, no matter how creative the arrangement is. The difference between an amateur beat and a professional one often comes down to EQ. For producers working in trap, drill, phonk, or pluggnb, understanding the equalizer in FL Studio is not optional; it is essential. The good news: you do not need expensive third-party tools to get started, because FL Studio includes a capable parametric EQ right out of the box. However, EQ can only polish what is already there, so starting with distinctive, studio-ready sounds makes the entire process faster. If you are looking for presets that stand on their own before any processing, explore our VST plugins for FL Studio.
Raw samples and presets contain frequencies that conflict with each other. That frequency buildup is what separates a clean master from a wall of noise. In this article, you will learn how FL Studio’s fl studio equalizer tools work, which techniques professional mix engineers rely on, and how choosing the right source sounds reduces the amount of corrective EQ you need in the first place.
What Is Parametric EQ 2 and Why It Matters
Fruity Parametric EQ 2 is an advanced seven-band parametric equalizer plugin with Standard (Infinite Impulse Response) and an advanced Linear Phase (Fast Fourier Transform) mode that allows fast parameter changes not normally possible with conventional FFT filters. It ships free with every edition of FL Studio, meaning every producer has access to professional-grade equalization from day one.
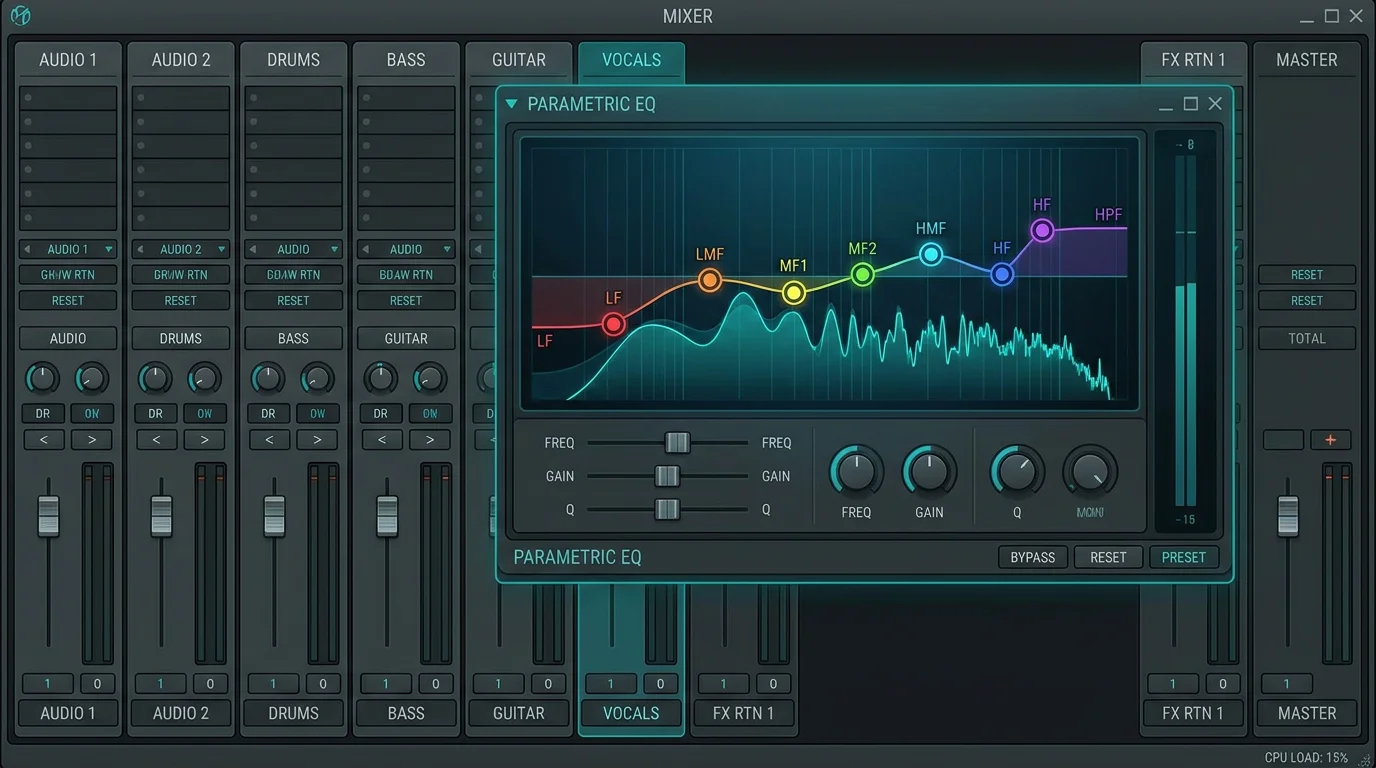
Parametric EQ 2 is a seven-band fully parametric equalizer with a real-time frequency analyzer. Each band gives you control over three parameters: frequency (the center point you are targeting), gain (how much you cut or add), and bandwidth (how wide or narrow the affected range is). According to the official FL Studio manual, band types include Low Pass, High Pass, Band Pass, Notch, Low Shelf, Peaking, and High Shelf, with filter slopes ranging from gentle to steep at up to 48 dB per octave.
This flexibility means a single instance of Parametric EQ 2 can handle surgical notch cuts on a resonant 808, broad tonal shaping on a pad, or a sharp high-pass filter on a vocal chop. For most beatmaking workflows, it is the only EQ you will need on the majority of mixer inserts.
Frequency Ranges Every Producer Should Know
Before you touch a single EQ band, you need a clear mental map of where instruments sit in the frequency spectrum. Without this knowledge, EQ adjustments become guesswork.
- Sub-bass (20 Hz to 60 Hz): Home of the 808 sub and kick fundamentals. This region provides the physical “feel” of a beat.
- Bass (60 Hz to 250 Hz): Kick body, bass guitar, and lower synth notes live here. Overcrowding this range causes a boomy, undefined low end.
- Low mids (250 Hz to 500 Hz): Often called the “muddy” zone. Subtly adjusting around 250 Hz to 500 Hz can clear up the boxy sound in melodic elements.
- Mids (500 Hz to 2 kHz): Snare body, vocal presence, and melodic leads occupy this territory.
- Upper mids (2 kHz to 6 kHz): Presence and bite. A small lift here helps hi-hats and vocals cut through.
- Highs (6 kHz to 20 kHz): A hi-hat sits above 6 kHz. Air and shimmer come from this range, but excessive energy here causes harshness.
When two instruments share the same frequency range, they mask each other and the mix sounds muddy. That is why producers need to carve intentional pockets for each element. Understanding these ranges before you start turning knobs is what separates a purposeful mix from a reactive one.
High-Pass Filtering: The Single Most Impactful Move
A high-pass filter is the single most impactful EQ move you can make in any mix. If you learn only one technique from this article, make it this one.
Almost every element that is not the kick or bass should have a high-pass filter applied. Every sample, synth, and recording contains low-frequency content, even if you cannot hear it. This inaudible rumble stacks up across all your channels and fills the low end with mud. To set this up in Parametric EQ 2, right-click Band 1 and change its type to High Pass. A steep filter slope gives the cleanest cut. Set the filter order to 8 for a sharp roll-off.
Start at 20 Hz and sweep upward while the beat plays. You will reach a point where the sound starts thinning out noticeably. Back off just below that point. For melodic loops and pads, a cutoff between 80 Hz and 150 Hz is a common starting range. For vocals, 100 Hz to 200 Hz works well depending on the timbre.
This single move clears space for your kick and 808 to breathe, and it costs you nothing in terms of perceived fullness on the filtered tracks.
Subtractive vs. Additive EQ: The Professional Approach
Should you cut the frequencies you do not want or add the ones you do? A professional EQ approach is roughly 80% cuts and 20% boosts, according to a 2026 deep dive on Parametric EQ 2 by Audeobox.
Subtractive EQ removes problem frequencies without adding energy to the signal. A 3 dB cut at 400 Hz on a snare removes boxiness and makes the snare sound cleaner. The result is more headroom and a cleaner overall mix. Cuts rarely cause new problems because you are removing issues rather than introducing them.
Additive EQ increases specific frequencies. A 2 dB boost at 8 kHz on hi-hats adds shimmer and air. However, boosting adds energy to the signal, which eats headroom and can introduce harshness if overdone. Keep boosts small: 1 to 3 dB maximum.
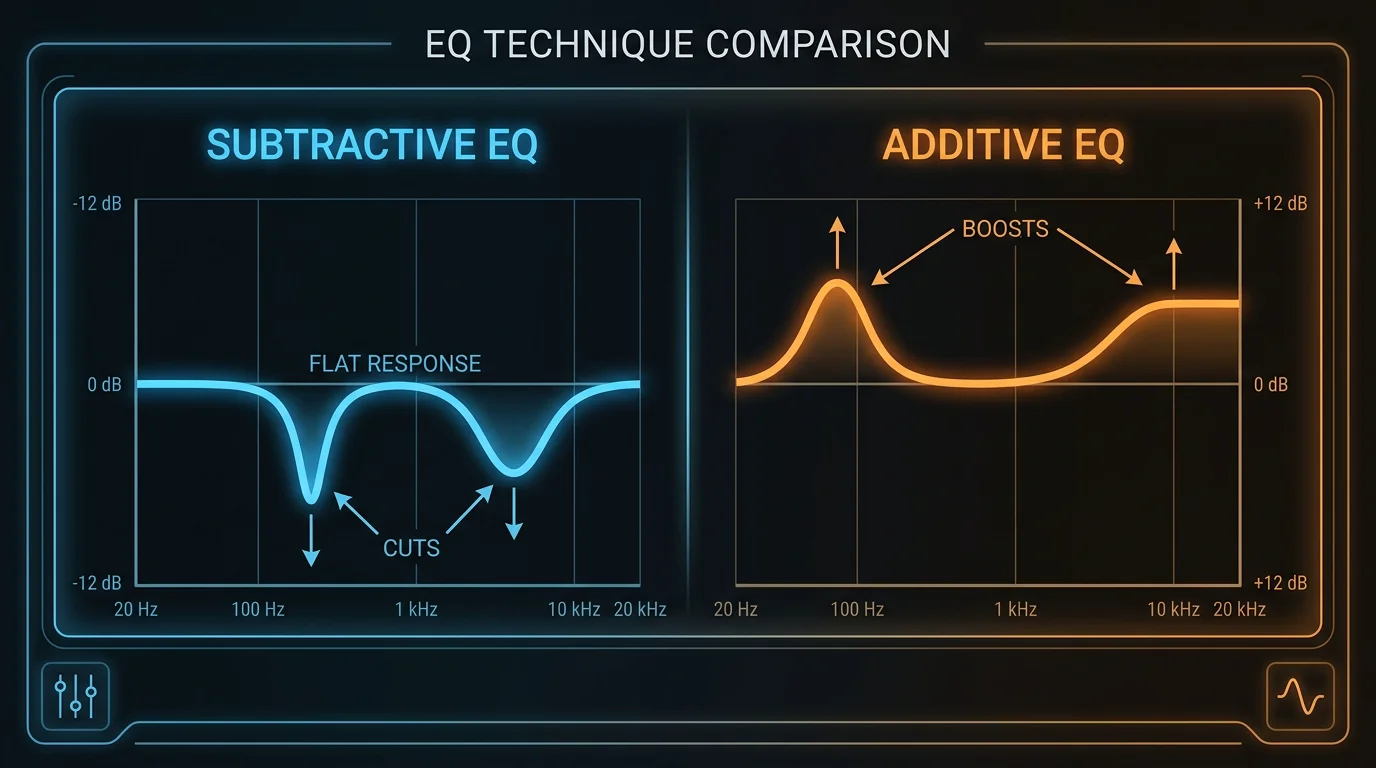
The takeaway is straightforward: cut the mud, boxiness, and harshness first. Then, if the sound still lacks character, apply gentle, narrow boosts to bring out the frequencies that define the instrument. This approach preserves headroom and keeps your master bus clean.
How Source Sound Quality Reduces Your EQ Workload
Here is a reality that many tutorials overlook: the less corrective EQ you need, the better your final mix will sound. If your source presets are thin, noisy, or poorly designed, you end up spending most of your mixing time compensating rather than enhancing. EQ is a powerful tool that can make a significant difference in the quality and clarity of your mixes, but it cannot manufacture harmonics that were never there.
This is precisely where preset selection matters. Generic sample packs often ship with presets tuned to sound impressive in isolation but collapse when layered into a full arrangement. They crowd the same midrange frequencies, forcing you into aggressive subtractive EQ that hollows out the sound. Quality presets designed for specific genres already occupy well-defined frequency pockets.
Our Pendora sound bank, for example, includes over 275 studio-ready presets hand-crafted for trap, drill, dark trap, phonk, boom bap, and pluggnb. Each preset is voiced to sit cleanly in a mix, so your EQ moves stay in the “gentle polish” category rather than “damage control.” If you are exploring new tools for your workflow, check out our collection of best VST plugins for FL Studio to find sounds that need minimal corrective processing.
Linear Phase vs. Minimum Phase: When to Use Each Mode
Parametric EQ 2 offers two distinct processing modes, and choosing the right one affects both your audio quality and CPU usage.
Minimum Phase (Standard/IIR) is the default mode. It processes audio with near-zero latency and minimal CPU cost. The trade-off is that it introduces phase rotation around the filter cutoff frequency. For individual mixer inserts during the production stage, this mode is ideal. Phase shifts are typically inaudible in isolation and do not cause problems unless you are summing the processed signal with a parallel dry signal.
According to the FL Studio documentation, enabling the phase rotation display lets you see exactly where phase shifts occur. The manual notes that “if something sounds good, it is good,” reinforcing that phase rotation is a normal phenomenon of IIR filters and characteristic of analog hardware as well.
Linear Phase (LIN) uses FFT-based filtering that preserves the original phase relationships across the spectrum. This comes at the expense of increased plugin latency and higher CPU load. Use this mode on your master bus or on parallel processing chains where phase alignment is critical (for example, when blending a compressed and an uncompressed copy of the same signal).
For most beatmaking sessions in FL Studio, Minimum Phase mode is the practical choice. Reserve Linear Phase for mastering passes and critical bus processing.
EQ Workflow for Common Beat Elements
Knowing the theory is one step; applying it consistently across a full arrangement is another. Below is a practical workflow for the elements that appear in nearly every trap, drill, or phonk beat.
Kick and 808
These two elements share the sub-bass and bass ranges, so clarity here determines the punch of your entire beat. High-pass the kick at around 30 Hz to remove inaudible rumble. If the 808 and kick clash, apply a narrow cut on the kick at the 808’s fundamental frequency (often 40 Hz to 60 Hz). Conversely, cut the 808 slightly where the kick’s attack lives (around 80 Hz to 120 Hz). This creates interlocking frequency pockets.
Melodies and Pads
High-pass aggressively at 100 Hz to 200 Hz. Apply a gentle cut in the 250 Hz to 500 Hz range to eliminate boxiness. If the melody needs more presence, a subtle 1 to 2 dB shelf boost above 8 kHz adds air without harshness. Starting with presets that are already frequency-balanced saves considerable time. For producers seeking best VST plugins with that balance built in, Pendora presets are specifically voiced for melodic trap and pluggnb contexts.
Snare and Clap
High-pass at 80 Hz to 120 Hz. Target boxiness at 300 Hz to 500 Hz with a narrow 2 to 3 dB cut. For snap, apply a small boost at 2 kHz to 4 kHz. Be cautious with the 1 kHz to 2 kHz range, as excessive energy here sounds nasal.
Hi-Hats and Cymbals
High-pass at 300 Hz to 500 Hz. These elements should occupy the top of the spectrum without bleeding into the midrange. A small shelf cut below 6 kHz keeps them from adding unnecessary energy to the vocal or melody zone.
Third-Party EQ Plugins Worth Considering
Parametric EQ 2 handles the vast majority of mixing tasks, but some producers eventually look for specialized tools. Here is a brief comparison of well-known options alongside FL Studio’s native offering.
| Plugin | Type | Phase Modes | CPU Load | Included Free with FL Studio |
|---|---|---|---|---|
| Fruity Parametric EQ 2 | 7-band parametric | IIR + Linear Phase | Low | Yes |
| FabFilter Pro-Q 3 | Up to 24 bands | IIR + Linear + Mixed | Moderate | No |
| TDR Nova (free tier) | 4-band dynamic | IIR | Low | No |
| Vital (built-in EQ) | Synth-internal | IIR | Low | No (free synth) |
For most producers working in FL Studio, the native Parametric EQ 2 paired with quality source sounds delivers professional results. If you are looking for free audio plugins to complement your workflow, focus on dynamic EQ or mid-side processing tools that fill gaps the native EQ does not cover.
Practical Tips to Sharpen Your EQ Decisions
EQ separation is the single biggest factor in making your beat sound clear, punchy, and professional in a competitive playback environment. Here are principles that accelerate your progress.
- EQ in context, not in solo. Soloing a track reveals detail, but your EQ decisions must serve the full mix. Always check your changes with all channels playing.
- Use the band solo feature. Hold Shift and click a band token in Parametric EQ 2 to momentarily isolate the frequency you are targeting. This helps you confirm you are cutting the right problem area without affecting your main mix bus.
- Reference commercial tracks. Load a reference beat into a mixer channel and compare your frequency balance. The spectrum analyzer in Parametric EQ 2 makes A/B comparisons straightforward.
- Cut before you add plugins. Many producers reach for reverb, saturation, or compression before they have addressed frequency conflicts. EQ should be the first insert on most channels. The same principle applies to best reverb plugins: reverb sounds far cleaner when applied to an already well-equalized source.
- Trust your ears over the visual. The frequency analyzer is a guide, not a prescription. Two mixes with identical-looking spectrums can sound dramatically different.
Consistency is the key. Apply these principles on every session, and EQ decisions become intuitive rather than laborious.
Mastering the equalizer in FL Studio is a foundational skill that directly determines mix clarity, punch, and competitive loudness. Whether you produce trap, drill, phonk, or pluggnb, the techniques in this article apply to every session you open. Remember: a professional mix is roughly 80% subtractive cuts and 20% gentle boosts, and the quality of your source sounds dictates how much corrective work you face. Starting with presets that are already voiced for your genre saves hours of frustration and delivers a cleaner result. Our Pendora sound bank provides exactly that: 275+ hand-crafted, royalty-free presets designed to sit cleanly in a mix from the moment you load them. To hear the difference quality source sounds make in your productions, explore our Pendora presets and start your next session with sounds that need polish, not repair.
Frequently Asked Questions
Is Parametric EQ 2 good enough for professional mixes?
Yes. Parametric EQ 2 is a fully featured seven-band parametric equalizer with both IIR and Linear Phase modes. It handles surgical cuts, broad tonal shaping, and spectrum analysis. Many professional producers rely on it exclusively for mixing within FL Studio.
How do I reduce muddiness in my beats?
Apply a high-pass filter on every element except the kick and bass, cutting below 80 Hz to 200 Hz depending on the instrument. Then target the 250 Hz to 500 Hz range with narrow subtractive cuts. Starting with well-designed presets, such as those in our Pendora collection, also reduces mud because the sounds are crafted to occupy defined frequency ranges.
Should I use Linear Phase mode on every channel?
No. Linear Phase mode increases latency and CPU usage. Reserve it for your master bus or parallel processing chains where phase alignment matters. For individual mixer inserts during production, the default Minimum Phase (IIR) mode is more efficient and sounds equally good in most practical scenarios.